Utilizing a chiminea for the first time
Are you thinking about having a fireplace in the backyard? Maybe you want to consider a chiminea fireplace. Outdoor fire pit chiminea are easy to assemble, they make a great pottery decor and if ever you are moving to a new location, it's easy to just take it with you.
Fire pit chimineas are not only for decor, but some models are beautiful pizza oven as well. Today We will be covering the capabilities of these garden fireplaces called chimineas that come with all the accessories for cooking.
What is a chiminea?
Chimineas are Mexican-inspired garden ovens used to decorate and to cook.
Clay chimeneas also spelled chiminea (from Spanish: chimenea which derive from French cheminée, "chimney"), is a freestanding front-loading fireplace or oven with a bulbous body and usually a vertical smoke vent or chimney.
They serve as wood stove for patio warmer or just cuddling near a bonfire during fall season evenings.

The first step after getting your new garden clay chiminea is seasoning your new chiminea.
How to season a new chiminea
As any other piece of pottery, garden chimneys need to be prepared to prevent clay to crack. Extreme temperatures are not a good idea on new ceramic pieces, but after following these steps, you will be enjoying your new chiminea for long time. Don't forget, a chiminea can reach temperatures as high as 900F and this creates expansion to clay. Once the chiminea is cold, the pores close again but can keep moisture inside. This moisture can create cracks if not properly taking care of these following steps:
Instructions for lighting your new chiminea

Is a chiminea safer than a fire pit?
Chimineas are typically safer than fire pits. Thanks to the stack or chimney on the top of a chiminea, flames are directed up and out. Also clay chimineas are more suitable for families with children, being much safer than fire pits. Clay gets warm but not to an extreme as metal fire pits. Metal fire pits can cause more damage to kids since the metal gets too hot, while the clay chimineas will get warm but still not in the same level.
Should I buy a fire pit or chiminea?
Depending on the usage that you expect, chimineas will be better than fire pits. If you are planning to upgrade your garden decor, to bake or to cook and to have it cleaner and good looking for long time, then clay chimineas are the way to go.
If you plan to repaint your garden cooking item every year and not to worry about crashing it with your lawn mover, then metal fire pits are best. Either way, clay chimineas offer better cooking performance and they are a great backyard decor.
How to cook with a chiminea?
Cooking on a chiminea is very similar than cooking on a bbq. You just have to remind that a clay chiminea may be more fragile than a steel bbq.
For a complete list of the tools needed to make home pizza, please scroll down to view deals.
Chimineas can be made of different materials, as steel, aluminum, iron cast and clay. Today We will be covering the essentials on cooking on clay chimneas. Cast iron chimineas are a great addition to your patio and they last forever. But if not taking care properly, they tend to show rust, being toxic for food cooking.
Clay chimeneas are great for creating an outdoor fireplace easily and if ever you want to move to another spot on the garden, it's easy. The model that is showcast on the images is constructed in two pieces, so it's even easier to move. The total weight is 45 lbs but every piece weights the half of it.
A clay chiminea creates a focal point on your garden decor, it creates beauty as a well constructed farmhouse style pottery decor.
how to cook pizza on a wood fired chiminea oven?
First of all, the chiminea needs to reach high temperature.
Put a layer of charcoal on the bottom of the chiminea and fire it up. Once its warm, add the wood ( up to 2" diameter) and let flames heat the pizza stone. Once the temperature is 700F or higher, remove the pizza stone and add pizza dough on it. Replace pizza stone to the chiminea.
Since the temperature is so elevate, the pizza dough will start raise instantly. Turn the pizza dough every half a minute. Once you feel the pizza dough starts to harden, remove it to add the cheese on it and put it again on the stone.

What to use to light a chiminea?
To light a chiminea you can use these four materials: coal, wood, pellets, charcoal.
Personally, when cooking bbq style food, prefer to use only charcoal. When cooking pizza, I light a layer of charcoal first and add wood gradually. The flames reach the pizza stone and the clay reaches hight temps. Charcoal is easy to find at your local hardware store and there are brands selling it smokeless, which is great when using your chimenea on your gazebo or patio.

What else to cook in a pizza oven chiminea other than pizza?
You can cook so many delicious recipes on a clay oven chiminea that you could be finding new recipes every week.
Don't limit just to cook pizza, since you can prepare many more.
Let's start by three easy recipes here.
Easy recipes to cook on a chiminea garden fire pit

Look at these delicious and easy 3 recipes ( only 1 is pizza)
- Tangy Pepper-Pecan Brie
- Taffy Apple Pizza
- White Pizza ( so easy that you will try it this next Sunday)
First is first, now that you know how to season your new chiminea and how to light your new clay fireplace chiminea, let's use it as a real chef.
Tools to prepare homemade pizza
For these recipes, you will need: (click on links to view deals)
a pizza peel
a thermometer
a pizza cutter
a dough scrapper
a pair of oven mitts
a food scale
...and your new chiminea
Here are the easiest recipes for clay chiminea

Tangy Pepper-Pecan Brie
→ SERVES 12
Prep Time: 10 mins Total Time: 20 mins
1/2 cup (125 mL) pecan halves
1 jalapeño pepper, stemmed and seeded
1/4 cup (60 mL) apricot preserves
1 4-inch round (8 oz./230 g) Brie cheese with rind, room temperature
1 loaf (16 oz./450 g) French baguette Vegetable oil
PREP:
- Preheat chiminea fire pit near 500°F (260°C). Coarsely chop pecans. Chop jalapeño using the Food Chopper. In bowl, combine the jalapeño and preserves; mix well.
- Cut Brie in half horizontally. Place one half of Brie, cut side up, onto center of the Pizza Stone. Spread half of the apricot mixture evenly over bottom half of Brie using Small Spreader. Top with half of the pecans and remaining half of Brie, cut side up. Spread the remaining apricot mixture over Brie; sprinkle with remaining pecans.
- Using a bread knife, cut baguette on a bias into twenty-four 1/4-inch-thick (6-mm) slices. Arrange baguette slices around Brie; spray with oil using the Kitchen Spritzer. Bake 8–10 minutes or until baguette slices are golden brown and Brie begins to soften. Remove from chiminea fire pit; let stand 5 minutes before serving.
Cook’s Tips
Variations
Sun-Dried Tomato Pesto Brie: Substitute 2 ⁄3 cup (150 mL) sun-dried tomatoes in oil, drained, patted dry and chopped for the apricot preserves. Substitute 1 tbsp (15 mL) prepared basil pesto for the jalapeño pepper and 1/4 cup (60 mL) pine nuts for the pecans. Proceed as recipe directs.
Brown Sugar Dijon Brie: Substitute 1/2 cup (125 mL) brown sugar for the apricot preserves, 1 tbsp (15 mL) Dijon mustard for the jalapeño pepper and 1/2 cup (125 mL) sliced almonds for the pecans. Reserve 1/4 cup (60 mL) of the almonds. Chop remaining almonds; combine chopped brown sugar, almonds and mustard. Assemble as directed in Step 2; top with reserved almonds. Proceed as recipe directs.
This recipe can also be prepared using a 20 oz. (575 g) round of Brie. Simply double the ingredients for the Brie. Place Brie in a 2-qt. (2-L) casserole dish and proceed as recipe directs. Bake 12–14 minutes or until Brie begins to soften.
For a simple garnish, slice a jalapeño pepper in half lengthwise using paring knife. Brush cut surface with apricot jam. Place next to Brie before baking.
This recipe can also be prepared on the Stone Bar Pan, if desired.
Camembert cheese can be substituted for the Brie, if desired.

Taffy Apple Pizza
→ SERVES 16
1 pkg (18 oz./540 g) refrigerated sugar cookie dough
1 pkg (8 oz/250 g) cream cheese, softened
½ cup (125 mL) packed brown sugar
¼ cup (60 mL) creamy peanut butter
½ teaspoon (2 mL) vanilla
2 medium Granny Smith apples
¼ cup (60 mL) caramel ice cream topping
½ cup (125 mL) peanuts, chopped
Prep:
- Preheat the oven to 350°F (176°C). Shape the cookie dough into a ball and place the dough in the center of the Pizza Stone; flatten the dough slightly. Using a lightly floured a Baker’s Roller®, roll out the dough into a 14" (35-cm) circle, about ¼" (6 mm) thick. Bake for 16–18 minutes or until the dough is a light golden brown. Remove the stone from the oven and let it cool for 10 minutes. Carefully loosen the cookie from the baking stone using a bread knife; let the cookie cool completely on the baking stone.
- Combine the cream cheese, brown sugar, peanut butter, and vanilla in a Small Batter Bowl and mix well. Spread the cream cheese mixture evenly over the baked cookie.
- Peel, core, and slice the apples using the Apple Peeler, Corer & Slicer. Cut the apple slices in half and arrange them evenly over the cream cheese mixture.
- Microwave the ice cream topping on HIGH for 30–45 seconds or until warm; drizzle the topping evenly over the apples. Chop the peanuts using a Food Chopper; sprinkle the nuts over the apples. Cut the pizza into wedges.
Cook’s Tips
Dip the apple slices in lemon-lime flavored carbonated soda or lemon juice to prevent them from turning brown.
Add a touch of spice to this dessert pizza by sprinkling ground cinnamon over the apple slices in Step 3.
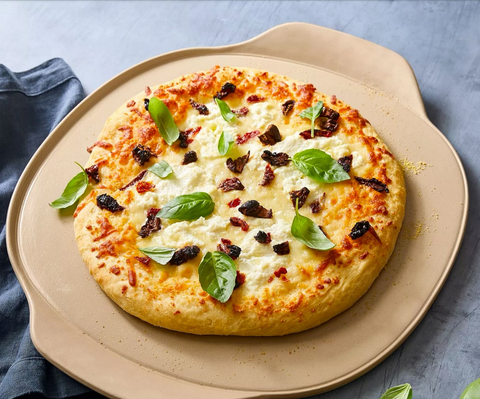
White Pizza
→ SERVES 6
Prep Time: 5 mins Total Time: 20 mins
½ lb. (250 g) prepared pizza dough
Cornmeal for dusting
1 tbsp (15 mL) olive oil
2 garlic cloves, pressed
4 oz. (125 g) mozzarella cheese, coarsely grated (1 cup/250 mL)
½ oz. (15 g) Parmesan cheese, finely grated (¼ cup/60 mL)
½ cup (125 mL) whole milk ricotta cheese
¼ cup (60 mL) oil-packed, sun-dried tomatoes, drained and chopped Salt and pepper
4–5 chopped basil leaves
Prep:
- Place the Pizza Stone on the middle rack of the oven, and preheat the oven to 450°F (230°C) for up to 30 minutes (see cook’s tips).
- Place the dough on a lightly floured surface and flatten with your hands. Starting at the center and working outwards, turn and stretch the dough into a 12" (30-cm) round disk, forming a lip around the edge. Fold the dough in half twice.
- Transfer the dough to a pizza peel dusted with cornmeal and unfold.
- Combine the olive oil and garlic; brush on the dough. Sprinkle with mozzarella and Parmesan. Spoon on dollops of ricotta. Top with chopped tomatoes, salt, and pepper.
- Transfer the pizza onto the stone in the oven and bake until the crust is browned and the cheese is melted, about 12–15 minutes. Top with basil just before serving.
Cook’s Tips
Pizza crust gets even crispier when cooked on a preheated stone.
Leftover dough? Tightly wrap and freeze it. You can thaw it overnight in the fridge or let it sit on the counter for about an hour.

I hope you enjoyed reading, now it's time to cook!
Hook me up on my social media arsenal and let me know how this goes for you (the links are on the bottom of this page)
Please, consider buying your new chiminea from this site, this supports these blogs and you get the same clay wooden fired oven chiminea that you see on these pictures with all included accessories.
Buying a chiminea in California
Here are all the models available
Do you want to send it as a gift? I gift wrap and insert greetings card at no extra cost, just type your needs when passing the order through my store here
Get the next Outdoor Living article right on your mailbox.
Visit https://solytierra.shop/blogs/outdoors/utilizing-a-chiminea for more
ReplyDelete